Don't throw away those beautiful Christmas cards after the season is over! You can reuse them. (Not quite the same as re-gifting, which Emily Post says is now ok, by the way ;). I saved a few of my favorite cards from last year and used some of the designs to make gift tags for Christmas gifts this year.
You can always use a tag-shaped punch to cut out the design, but I just used a pair of scissors.
Select cards that have elements or designs that would be easy to cut out.
Cut out your design and use a hole punch to create a hole for a piece of ribbon to attach the tag to your present.
Oh look! I found some jute (which I buy in bulk).
Just kidding! I don't buy this stuff in bulk, but you actually believed me for a second, didn't you?
Voila! Now you have some cute tags for your presents and they will cost you about nothin'.
Sunday, December 5, 2010
Tuesday, November 30, 2010
Mini Sheet Music Trees
Saw this idea in a Michael's flyer, but with scrapbook paper. Since I have so much sheet music leftover from my sheet music wreath, I thought I would give it a try. It was a wee bit time consuming, but I really like how the trees turned out.
I started by cutting out a whole bunch of these:
Then hot glued them to a couple of these:
Olivia likes to help out:
For the top of the tree, I hot glued on a mini silver ornament from a package of ornaments I bought in the dollar aisle of Target. On a side note, whoever thought of that little dollar section you see right when you walk into Target must be a billionaire. I stop every. single. time.
I had a little glitter glue left over from another project and I squirted it out onto some paper and used a paint brush to apply it to the tips of the sheet music triangles. Sparkly!
You likey?
Linking to:

I started by cutting out a whole bunch of these:
Then hot glued them to a couple of these:
Olivia likes to help out:
For the top of the tree, I hot glued on a mini silver ornament from a package of ornaments I bought in the dollar aisle of Target. On a side note, whoever thought of that little dollar section you see right when you walk into Target must be a billionaire. I stop every. single. time.
I had a little glitter glue left over from another project and I squirted it out onto some paper and used a paint brush to apply it to the tips of the sheet music triangles. Sparkly!
You likey?
Linking to:

Make a Fun Toddler Holiday Wreath!
I saw this fun activity posted on Toddler Toddler and I just had to include it here. Olivia and I plan on doing this craft this weekend.
From Toddler Toddler: "So toddlers like to do what they like to do! Let's have some fun making some holiday wreaths---toddler style. Be sure to find some colorful tissue paper and you'll be ready to get started.
Depending on how big of a wreath you want to make, you can either use a piece of white construction paper or posterboard for the backing. Then take your colored tissue paper and let your toddler help to tear it up into small pieces. FUN! Then put some glue on the paper and spread it around with your fingers. Next let your toddler put the tissue paper all over the glue to fill up the whole sheet. You can even put one some more glue on top and add a second layer of tissue paper on some places. You'll see that as you add more tissue paper, the layers will make some great colors!"
Click on the link below to learn more.
Activities to do at home with your toddler: make a Toddler Holiday wreath!
From Toddler Toddler: "So toddlers like to do what they like to do! Let's have some fun making some holiday wreaths---toddler style. Be sure to find some colorful tissue paper and you'll be ready to get started.
Depending on how big of a wreath you want to make, you can either use a piece of white construction paper or posterboard for the backing. Then take your colored tissue paper and let your toddler help to tear it up into small pieces. FUN! Then put some glue on the paper and spread it around with your fingers. Next let your toddler put the tissue paper all over the glue to fill up the whole sheet. You can even put one some more glue on top and add a second layer of tissue paper on some places. You'll see that as you add more tissue paper, the layers will make some great colors!"
Click on the link below to learn more.
Activities to do at home with your toddler: make a Toddler Holiday wreath!
Wednesday, November 24, 2010
How to Fold a Kick Ass Napkin
Impress your dinner guests by presenting a polished look to your Thanksgiving table with expertly folded napkins. My dear Aunt Sandee taught me how to make this napkin design and it is the only one I know how to do. This is a simple fan design.
For this design to work best, you need a perfectly square napkin. You can use not-perfectly-square napkins and the design will still work, but the fan will not look as nice. Cotton napkins are the best to use for this design. The napkin I used measured 19 by 19 inches.
Step 1: Start by ironing and lightly starching your napkins. This is a very important step, so do not skip it. In order for the design to look good, the napkins must be neatly pressed.
Step 2: Fold the napkin lengthwise so that the fold is on your left.
Step 3: You will be making 3 accordion folds. Each fold should be about 1 inch. Do not make the accordion folds larger than 1 inch.
Step 4: Once you have made your first accordion fold, make another one the same size.
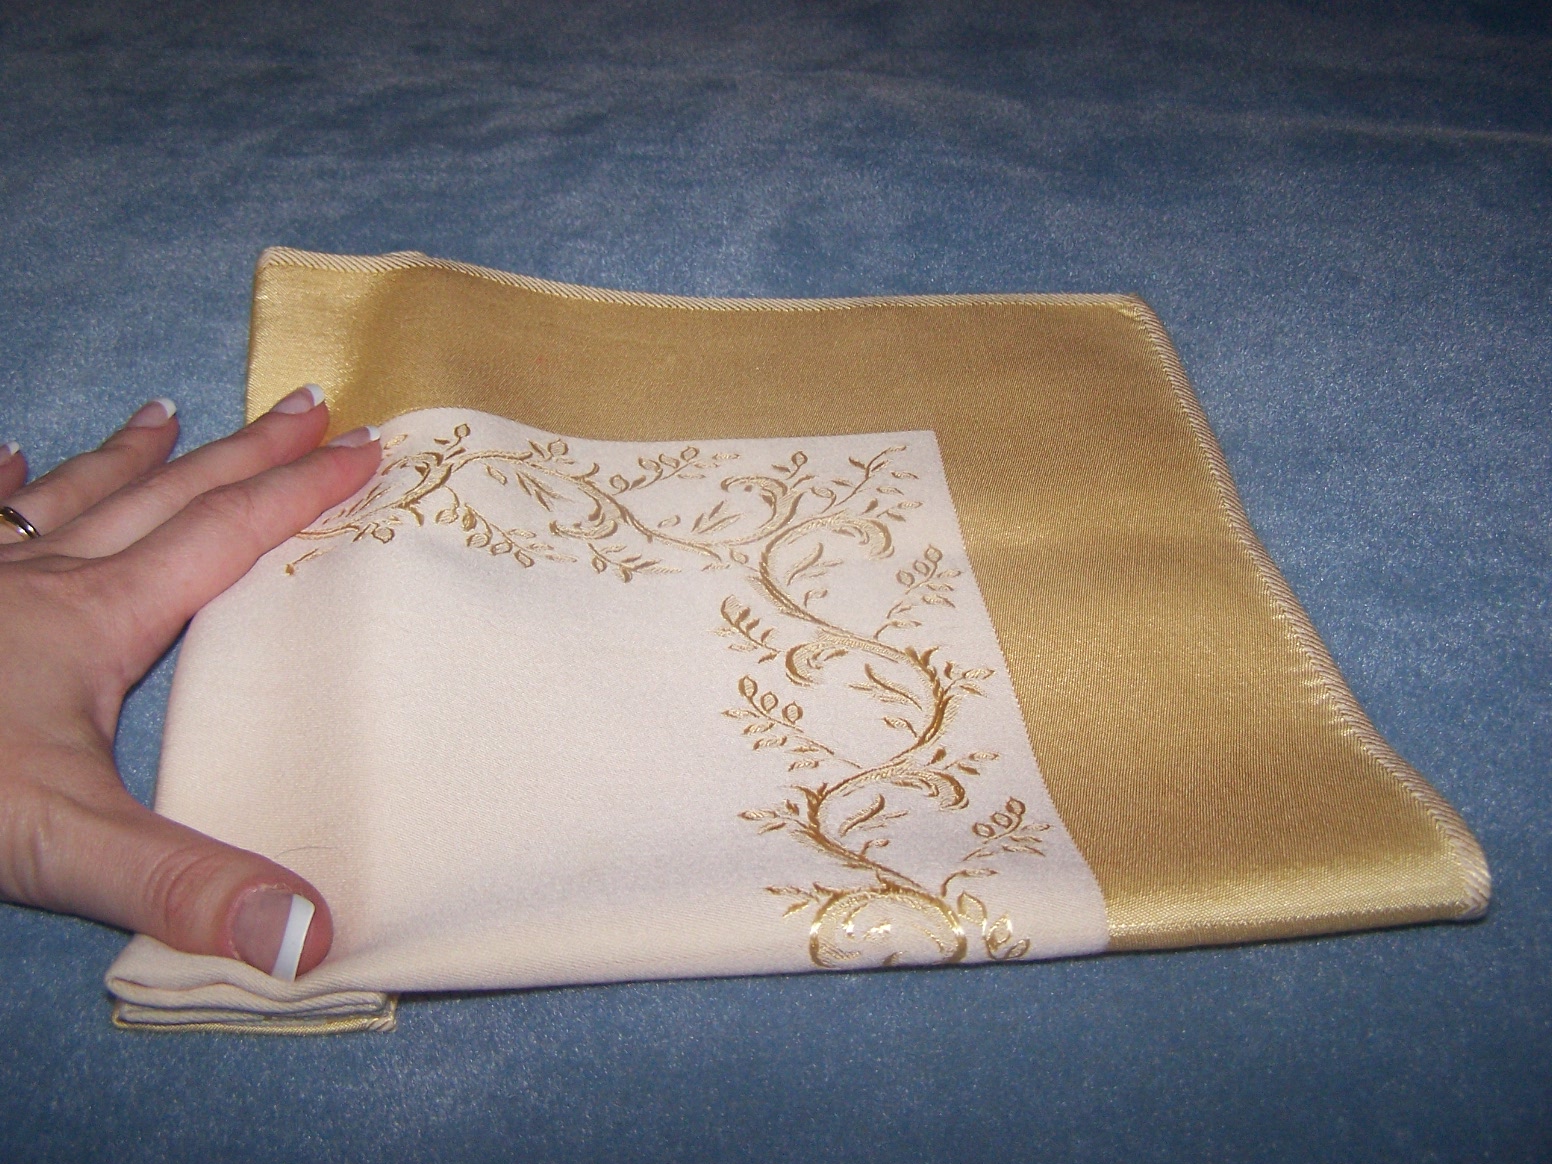
Remember to keep your napkin smooth and make sure that the edges are not askew. This is what your napkin is going to look like after the 3 accordion folds are complete. The first fold I did is on the top.
Step 5: Keeping your accordion folds firmly in place with your left hand, flip your napkin over so that the accordion folds are now on the bottom. Keep your left hand in place over the folds so that they do not come loose.
Step 6: Take the top half of the napkin (the edge that is furthest from you) and fold it in half towards you so that your napkin looks like this:
Step 7: One half of the accordion folds should now be on top on the napkin and the other half is facing the table. Fold the "tail" of the napkin up so that it is now parallel to the accordion fold on top.
Step 9: Your napkin should now look like this. It resembles a little boat. Notice in all the previous pictures that my left hand is always on the napkin. That is because if I were to take it away, the accordion folds would spring up and ruin everything. Now is the time to remove your left hand holding down those accordion folds. The folds should spring up and you should see your fan design.
Don't get discouraged if it doesn't turn out the first time. This design takes practice.
Linking to:

For this design to work best, you need a perfectly square napkin. You can use not-perfectly-square napkins and the design will still work, but the fan will not look as nice. Cotton napkins are the best to use for this design. The napkin I used measured 19 by 19 inches.
Step 1: Start by ironing and lightly starching your napkins. This is a very important step, so do not skip it. In order for the design to look good, the napkins must be neatly pressed.
Step 2: Fold the napkin lengthwise so that the fold is on your left.
Step 3: You will be making 3 accordion folds. Each fold should be about 1 inch. Do not make the accordion folds larger than 1 inch.
Step 4: Once you have made your first accordion fold, make another one the same size.
Remember to keep your napkin smooth and make sure that the edges are not askew. This is what your napkin is going to look like after the 3 accordion folds are complete. The first fold I did is on the top.
Step 5: Keeping your accordion folds firmly in place with your left hand, flip your napkin over so that the accordion folds are now on the bottom. Keep your left hand in place over the folds so that they do not come loose.
Step 6: Take the top half of the napkin (the edge that is furthest from you) and fold it in half towards you so that your napkin looks like this:
Step 7: One half of the accordion folds should now be on top on the napkin and the other half is facing the table. Fold the "tail" of the napkin up so that it is now parallel to the accordion fold on top.
Step 8: You will have a little extra hanging over. That is good, because you are going to tuck it under.
Step 9: Your napkin should now look like this. It resembles a little boat. Notice in all the previous pictures that my left hand is always on the napkin. That is because if I were to take it away, the accordion folds would spring up and ruin everything. Now is the time to remove your left hand holding down those accordion folds. The folds should spring up and you should see your fan design.
Happy Thanksgiving!
Linking to:

Tuesday, November 23, 2010
Crazy Crayons
What do you do with broken crayons? My toddler will no longer use them because they are "broken," as she repeatedly tells me. I try to explain that broken crayons still color, but she won't have any of it.
Making Crazy Crayons is a quick and easy way to use up some of those broken crayons and crayon stubs you may have laying around. Gather up all your broken crayons and stubs and remove all the paper wrappers.
Preheat your oven to 185 degrees F.
Find an old muffin tin to use as the mold for the crazy crayons.
Using a sharp knife and cutting board, cut up the crayons into pea size bits.
Fill the muffin tin with the colorful bits.
Place in the oven and keep an eye on them. You don't want them to completely melt. You want to remove them from the oven once they start melting and getting shiny. I think mine took about 10 minutes to start to melt. Once they are removed from the oven, they will continue to melt, so it is important that you don't leave them in the oven too long.
Pop the muffin tin into the freezer once it has cooled down reasonably enough to handle it. Leave it in the freezer for about 5 or 10 minutes, and the crazy crayons will pop right out.
I plan on bringing these to my inlaws' house for Thanksgiving along with a roll of butcher paper and let my daughter and her cousins have at it.
Making Crazy Crayons is a quick and easy way to use up some of those broken crayons and crayon stubs you may have laying around. Gather up all your broken crayons and stubs and remove all the paper wrappers.
Preheat your oven to 185 degrees F.
Find an old muffin tin to use as the mold for the crazy crayons.
Using a sharp knife and cutting board, cut up the crayons into pea size bits.
Mix up all the colors into a bowl or separate by color. Whatever works for you. I mixed all the colors up together.
Fill the muffin tin with the colorful bits.
Place in the oven and keep an eye on them. You don't want them to completely melt. You want to remove them from the oven once they start melting and getting shiny. I think mine took about 10 minutes to start to melt. Once they are removed from the oven, they will continue to melt, so it is important that you don't leave them in the oven too long.
Pop the muffin tin into the freezer once it has cooled down reasonably enough to handle it. Leave it in the freezer for about 5 or 10 minutes, and the crazy crayons will pop right out.
I plan on bringing these to my inlaws' house for Thanksgiving along with a roll of butcher paper and let my daughter and her cousins have at it.
BEFORE:
AFTER:
Awesome Giveaway from Infarrantly Creative!
One of my favorite blogs, Infarrantly Creative, is hosting an awesome Silhouette Giveaway! Get thee Infarrantly Creative to check it out! I SOOOOOOOOOOOOO want one of these! So versatile! So cool!
So what do you have to do for a chance to win?
1. Become a public follower of Infarrantly Creative. one entry
2. Become a facebook fan of Infarrantly Creative. one entry
3. Tweet about the giveaway - @infarrantly with a link to this post. one entry.
4. Mention this giveaway on Facebook. one entry.
5. Blog about it or put the giveaway on your sidebar. Then come back and leave me a link to your blog. one entry.
While you are there, poke around Beckie's blog. She has tons of great ideas and inspiration. Reading her blog was one of the reasons I started blogging in the first place. She is a beautiful person!
So what do you have to do for a chance to win?
1. Become a public follower of Infarrantly Creative. one entry
2. Become a facebook fan of Infarrantly Creative. one entry
3. Tweet about the giveaway - @infarrantly with a link to this post. one entry.
4. Mention this giveaway on Facebook. one entry.
5. Blog about it or put the giveaway on your sidebar. Then come back and leave me a link to your blog. one entry.
While you are there, poke around Beckie's blog. She has tons of great ideas and inspiration. Reading her blog was one of the reasons I started blogging in the first place. She is a beautiful person!
Wednesday, November 17, 2010
Industrial Light Bulb Transforms into Turkey
Somewhere on the blogosphere, I saw a really cute project where a crafter made a turkey out of a burned out light bulb. I really wanted to try it out, but all we have in our house are those weird squiggly CFL bulbs. When I was at work, our maintenance guy was changing out these huge industrial light bulbs in our shop area and I asked if I could have one.
He gave me the stink eye like he was wondering if I was planning to make a bong out of it or something. Actually, it would make a really nice bong if you removed the insides, but that is a different kind of post for a different kind of blog.
Anyway, here is what I had to work with and how I ended up making a turkey out of an industrial light bulb.
The bulb I used was a GE Multi-Vapor Lamp. I'm sure GE would be thrilled to learn of this unauthorized use of its product.
All I know is that it puts out a lot of light, get really hot, and costs a lot of money. Seems a shame to just toss it out, right?
Here is a shot of me holding the bulb so that you can get an idea of how big it is. Pretty nifty, huh?
The bulb can not stand up on its own because it has a funky little bump on the top, so I dug a little indentation in some floral foam and set it in there so that I could paint it.
I primed it first with some cheap-o primer Mr. Nitty Gritty had laying around the garage. One coat did the job.
Then I shot a coat of Rustoleum Satin in brown over the whole primed light bulb.
Kinda looks like chocolate, doesn't it?
Once it was dry, I turned it right-side up (yes, there is a right side up to this thing) and installed it in a little foam base I created and covered in burlap.
Now it kinda looks like it could be a lamp! I swear this thing is going to look like a turkey by the time you get to the end of this post. Promise.
Now I needed some feathers. I tried cutting some out of card stock I had on hand for scrapbooking, but the paper feathers ended up being too limp. And as you ladies know, limp is OUT. I needed something stiffer, so I went to Michael's and purchased stiffened felt. Yes, there is such a thing. Here is the photograph to prove it. 99 cents per sheet, so I am now six dollars in the hole making my turkey out of a free burned out bulb.
I cut the stiffened felt into nice turkey feathers,
But I was afraid they would still be too limp, so I gave them some Viagra.
Just kidding. I simply reinforced them with some floral wire attached with a hot glue gun. I can gently bend the tail feathers they way I want them to go instead of them sticking straight out.
I glued the tail feathers to the turkey's "bottom" and gave him some red felt legs and a yellow felt beak. I then glued on some googley eyes also purchased from Michael's. I looked all over the store for a little straw hat for him to wear to cover up the bulb's screw-in connector but I could not find one. I settled on a tiny clay flower pot which I placed on the turkey's "head" as a hat. I wrapped a bit of raffia around the "brim" and glued on a few colorful buttons. I added a raffia bow around his neck and now he looks like this:
Cute, huh? Happy Thanksgiving!

He gave me the stink eye like he was wondering if I was planning to make a bong out of it or something. Actually, it would make a really nice bong if you removed the insides, but that is a different kind of post for a different kind of blog.
Anyway, here is what I had to work with and how I ended up making a turkey out of an industrial light bulb.
The bulb I used was a GE Multi-Vapor Lamp. I'm sure GE would be thrilled to learn of this unauthorized use of its product.
All I know is that it puts out a lot of light, get really hot, and costs a lot of money. Seems a shame to just toss it out, right?
Here is a shot of me holding the bulb so that you can get an idea of how big it is. Pretty nifty, huh?
The bulb can not stand up on its own because it has a funky little bump on the top, so I dug a little indentation in some floral foam and set it in there so that I could paint it.
I primed it first with some cheap-o primer Mr. Nitty Gritty had laying around the garage. One coat did the job.
Then I shot a coat of Rustoleum Satin in brown over the whole primed light bulb.
Kinda looks like chocolate, doesn't it?
Once it was dry, I turned it right-side up (yes, there is a right side up to this thing) and installed it in a little foam base I created and covered in burlap.
Now it kinda looks like it could be a lamp! I swear this thing is going to look like a turkey by the time you get to the end of this post. Promise.
Now I needed some feathers. I tried cutting some out of card stock I had on hand for scrapbooking, but the paper feathers ended up being too limp. And as you ladies know, limp is OUT. I needed something stiffer, so I went to Michael's and purchased stiffened felt. Yes, there is such a thing. Here is the photograph to prove it. 99 cents per sheet, so I am now six dollars in the hole making my turkey out of a free burned out bulb.
I cut the stiffened felt into nice turkey feathers,
But I was afraid they would still be too limp, so I gave them some Viagra.
Just kidding. I simply reinforced them with some floral wire attached with a hot glue gun. I can gently bend the tail feathers they way I want them to go instead of them sticking straight out.
I glued the tail feathers to the turkey's "bottom" and gave him some red felt legs and a yellow felt beak. I then glued on some googley eyes also purchased from Michael's. I looked all over the store for a little straw hat for him to wear to cover up the bulb's screw-in connector but I could not find one. I settled on a tiny clay flower pot which I placed on the turkey's "head" as a hat. I wrapped a bit of raffia around the "brim" and glued on a few colorful buttons. I added a raffia bow around his neck and now he looks like this:
Cute, huh? Happy Thanksgiving!
Subscribe to:
Posts (Atom)